SUIT: Device firmware update on the nRF54H20 SoC
The sample demonstrates how to update and boot the nRF54H20 System-on-Chip (SoC) using the Software Update for Internet of Things (SUIT) procedure on the application and radio cores of the SoC. The update on the nRF54H20 SoC can be done over Bluetooth® Low Energy or UART.
Requirements
The sample supports the following development kit:
Hardware platforms |
PCA |
Board name |
Board target |
|---|---|---|---|
PCA10175 |
|
You need the nRF Device Manager app for SUIT update over Bluetooth Low Energy:
nRF Device Manager mobile app for Android (The minimum required version is v2.0.)
nRF Device Manager mobile app for iOS (The minimum required version is v1.7.)
For a SUIT update over UART, you need to install MCUmgr, a tool that can be used to upload SUIT envelopes through the SMP protocol.
Overview
The sample uses one of the following methods to perform a firmware update on the nRF54H20 SoC, featuring Nordic Semiconductor’s implementation of the SUIT procedure:
Bluetooth Low Energy and the nRF Device Manager app
UART and MCUmgr
The sample demonstrates how to perform a DFU of the application and radio firmware.
SUIT is the only DFU procedure supported for the nRF54H20 SoCs. To read more about the SUIT procedure, see Introduction to SUIT.
User interface
- LED 0:
The number of blinks indicates the application SUIT envelope sequence number. The default is set to
1to blink once, indicating “Version 1”.
Configuration
See Configuring and building for information about how to permanently or temporarily change the configuration.
The default configuration uses UART with sequence number 1 (shown as Version 1 in the nRF Device Manager app).
To change the sequence number of the application, configure the APP_ROOT_SEQ_NUM inside the VERSION file, used for Application version management in Zephyr and the nRF Connect SDK.
It sets the sequence number of the SUIT envelope’s manifest.
If you do not provide the VERSION file, the sample is built with sequence number set to 1 (shown as Version 1 in the nRF Device Manager app).
To change the number of blinks on LED 0, configure the CONFIG_N_BLINKS Kconfig option.
If you do not specify this configuration, the sample is built with the number of blinks set to 1.
Configuration options
Check and configure the following configuration option for the sample:
- CONFIG_N_BLINKS - Configuration for the number of blinks.
The sample configuration change the number of blinks on LED 0. The default value is
1.
Modify partition sizes
You can also modify the size and location of the partitions.
This is done by modifying the values for the desired location and size of the partition in the devicetree .overlay files.
To modify the application core’s partition size, modify the values for
cpuapp_slot0_partitiondefined in thenrf/samples/suit/smp_transfer/sysbuild/nrf54h20dk_nrf54h20_memory_map.dtsi.To modify the DFU partition, modify the values for
dfu_partitiondefined insamples/suit/smp_transfer/boards/nrf54h20dk_nrf54h20_cpuapp.overlay. This partition is where the update candidate is stored before the update process begins.
Manifest template files
The SUIT DFU procedure requires an envelope to transport the firmware update, and SUIT envelopes require a SUIT manifest template as a source file. All required manifest template files (used to later create SUIT envelopes) are automatically created during the first sample build, and are the following:
The root manifest -
root_hierarchical_envelope.yaml.jinja2The application domain manifest -
app_envelope.yaml.jinja2The radio domain manifest -
rad_envelope.yaml.jinja2
See SUIT output build files for a full table of SUIT-generated output files.
Note
The radio domain manifest template (radio.suit) is only created when building the Bluetooth Low Energy version of the sample, and not the UART version.
Currently, it is not needed for the UART version.
If you want to make modifications to how the DFU is executed in this sample, you can do so by editing the manifest templates, or generating your own custom manifests. See the How to customize the SUIT DFU process user guide for instructions and examples.
External flash support
You can build the application with external flash support by running the following command from the sample directory:
west build ./ -b nrf54h20dk/nrf54h20/cpuapp -T sample.suit.smp_transfer.cache_push.extflash
With this configuration, the sample is configured to use UART as the transport and the external flash is enabled.
To see which Kconfig options are needed to achieve that, see the sample.suit.smp_transfer.cache_push.extflash configuration in the samples/suit/sample.yaml file.
To enable both the external flash and the BLE transport, use the following command:
west build ./ -b nrf54h20dk/nrf54h20/cpuapp -T sample.suit.smp_transfer.cache_push.extflash.bt
Note
This way of building the application will enable the push scenario for updating from external flash. It will also extract the image to a DFU cache partition file. For more information, see How to push SUIT payloads to multiple partitions.
Building and running
This sample can be found under samples/suit/smp_transfer in the nRF Connect SDK folder structure.
Note
When building repository applications in the SDK repositories, building with sysbuild is enabled by default.
If you work with out-of-tree freestanding applications, you need to manually pass the --sysbuild parameter to every build command or configure west to always use it.
Building and programming using the command line
To build and program the sample to the nRF54H20 DK, complete the following steps:
Start the toolchain environment in a terminal window.
Navigate to
samples/suit/smp_transfer.Build the sample using the following command, with the following Kconfig options set:
west build -p -b nrf54h20dk/nrf54h20/cpuapp -- -DFILE_SUFFIX=bt -DCONFIG_N_BLINKS=1The output build files can be found in the
build/DFUdirectory, including the SUIT output build files. For more information on the contents of the build directory, see Build Directory Contents in the Zephyr documentation. For more information on the directory contents and structure provided by sysbuild, see Sysbuild (System build) in the Zephyr documentation.Connect the DK to your computer using a USB cable.
Power on the DK.
Program the sample to the kit (see Programming an application for instructions).
Update the SUIT envelope sequence number, by appending the following line to the
VERSIONfile:APP_ROOT_SEQ_NUM = 2Update the number of LED blinks, by rebuilding the sample with the following Kconfig options set:
west build -b nrf54h20dk/nrf54h20/cpuapp -- -DFILE_SUFFIX=bt -DCONFIG_N_BLINKS=2Another
root.suitfile is created after running this command, that contains the updated firmware. You must manually transfer this file onto the same mobile device you will use with the nRF Device Manager app.
Start the toolchain environment in a terminal window.
Navigate to
samples/suit/smp_transfer.Build the sample:
west build -p -b nrf54h20dk/nrf54h20/cpuappIf you want to further configure your sample, see Configuring and building for additional information.
After running the
west buildcommand, the output build files can be found in thebuild/dfudirectory. The output build files can be found in thebuild/DFUdirectory, including the SUIT output build files. For more information on the contents of the build directory, see Build Directory Contents in the Zephyr documentation. For more information on the directory contents and structure provided by sysbuild, see Sysbuild (System build) in the Zephyr documentation..Connect the DK to your computer using a USB cable.
Power on the DK.
Program the sample to the kit (see Programming an application for instructions).
Update the SUIT envelope sequence number, by appending the following line to the
VERSIONfile:APP_ROOT_SEQ_NUM = 2Update the number of LED blinks, by rebuilding the sample with the following Kconfig options set:
west build -b nrf54h20dk/nrf54h20/cpuapp -- -DCONFIG_N_BLINKS=2Another
root.suitfile is created after running this command, that contains the updated firmware.
Testing
After programming the sample to your development kit and updating the sequence number of the SUIT envelope, complete the following steps to test it.
Upload the signed envelope onto your mobile phone:
Open the nRF Device Manager app on your mobile phone.
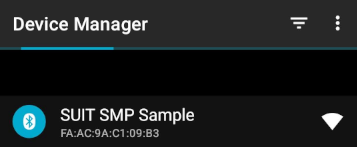
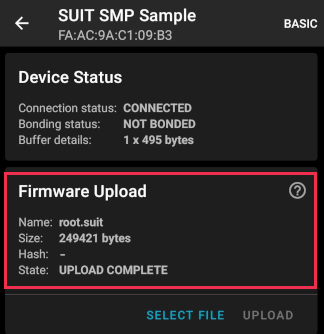
Select the device SUIT SMP Sample. You should see the following:
From the SUIT SMP Sample screen, on the Images tab at the bottom of the screen, click on ADVANCED in the upper right corner of the app to open a new section called Images.
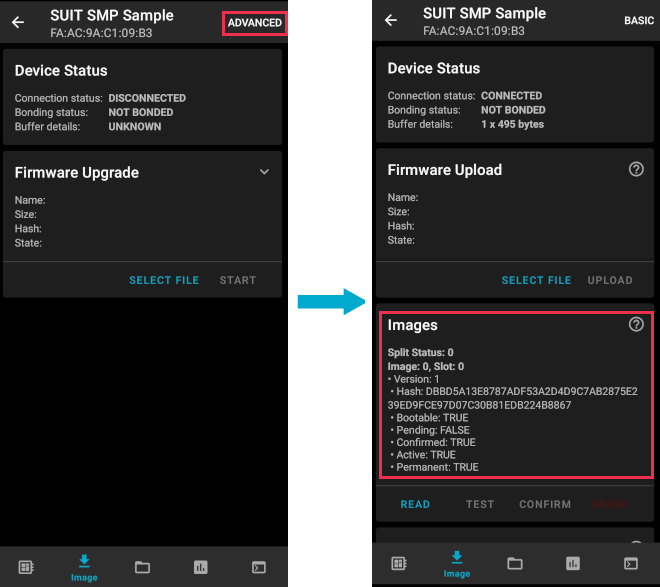
Click on the READ button within the Images section.
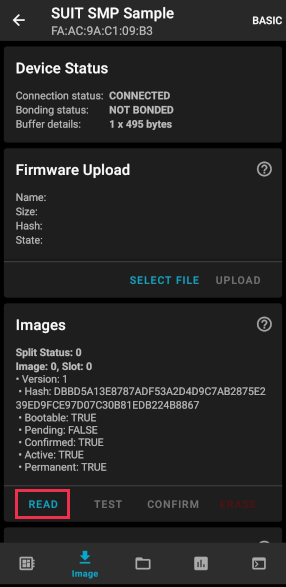
You should now see that “Version: 1” is printed in the Images section of the mobile app.
From the Firmware Upload section, click on SELECT FILE and select the
root.suitfile from your mobile device.Note
As described in Step 1, you must manually add the
root.suitfile to the same mobile device you are using for nRF Device Manager.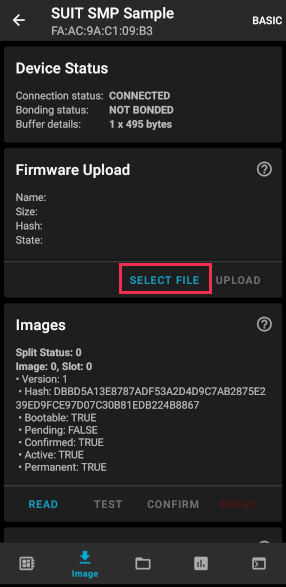
Click on UPLOAD to upload the
root.suitfile.You should see an upload progress bar below the “UPLOADING…” text in the Firmware Upload section.

The text “UPLOAD COMPLETE” appears in the Firmware Upload section once completed.
Reconnect your device.
Select the device SUIT SMP Sample once again.
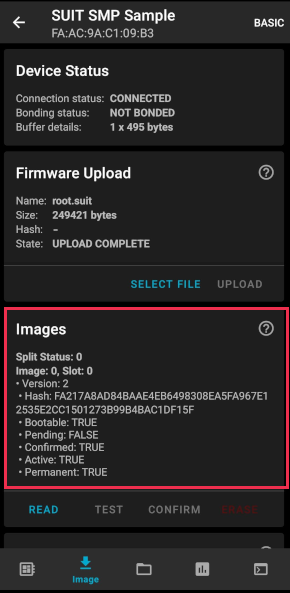
Under the Images section, click on READ.
You should see that “Version: 2” is now printed in the Images section of the mobile app.
Additional, LED 0 now flashes twice now to indicate “Version 2” of the firmware.
Upload the signed envelope:
Read the version and digest of the installed root manifest with MCUmgr:
mcumgr --conntype serial --connstring "dev=/dev/ttyACM0,baud=115200" image listYou should see an output similar to the following logged on UART:
image=0 slot=0
   version: 1
   bootable: true
   flags: active confirmed permanent
   hash: d496cdc8fa4969d271204e8c42c86c7499ae8632f131e098e2e0fb5c7bbe3a5f
Split status: N/A (0)
Upload the image with MCUmgr:
mcumgr --conntype serial --connstring "dev=/dev/ttyACM0,baud=115200" image upload build/DFU/root.suitYou should see an output similar to the following logged on UART:
0 / 250443 [---------------------------------------------------------------------------------------------------------------------------------------------------------------------------------------------]   0.00%
18.99 KiB / 244.57 KiB [============>-------------------------------------------------------------------------------------------------------------------------------------------------]   7.76% 11.83 KiB/s 00m19s
66.56 KiB / 244.57 KiB [==========================================>-------------------------------------------------------------------------------------------------------------------]  27.21% 18.44 KiB/s 00m09s
112.12 KiB / 244.57 KiB [=======================================================================>-------------------------------------------------------------------------------------]  45.84% 19.97 KiB/s 00m06s
154.08 KiB / 244.57 KiB [==================================================================================================>----------------------------------------------------------]  63.00% 20.22 KiB/s 00m04s
197.40 KiB / 244.57 KiB [==============================================================================================================================>------------------------------]  80.71% 20.51 KiB/s 00m02s
241.16 KiB / 244.57 KiB [=================================================================================================================================================================>--]  98.60% 20.74 KiB/s
Done
If you have built the application with external flash support, upload the cache partition to the external flash using the following command:
mcumgr --conntype serial --connstring "dev=/dev/ttyACM0,baud=115200" image upload -n 2 build/DFU/dfu_cache_partition_1.bin

.. note::
   the ``-n 2`` parameter uploads to DFU cache partition 1 (where image 0 is the envelope and image 1 is the cache partition 0).
Start the installation of the new firmware as follows:
mcumgr --conntype serial --connstring "dev=/dev/ttyACM0,baud=115200" image confirmRead the version and digest of the uploaded root manifest with MCUmgr:
mcumgr --conntype serial --connstring "dev=/dev/ttyACM0,baud=115200" image listYou should see an output similar to the following logged on UART:
image=0 slot=0
   version: 2
   bootable: true
   flags: active confirmed permanent
   hash: 707efbd3e3dfcbda1c0ce72f069a55f35c30836b79ab8132556ed92ce609f943
Split status: N/A (0)
You should now see that LED 0 flashes twice now to indicate “Version 2” of the firmware.